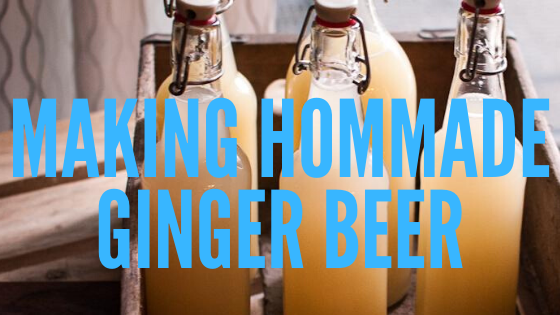
How to Brew Real Ginger Beer at Home
Two routes to a spicy, fermented ginger beer with a genuine kick , from a five-minute no-boil starter to a full brew-day method, plus how to fix it when it goes sideways.
Despite what half the recipe sites online will tell you, ginger ale and ginger beer are not the same drink. Ginger ale is carbonated water flavoured with ginger syrup: a soft drink. True ginger beer is fermented, built from raw ginger, yeast and sugar, and it carries a spicy, warming, faintly boozy depth that no soda stream can fake. Get it right and you end up with something between a craft cider and a fiery old English ale, with a throat-kick all its own.
The drink has real history behind it. Ginger beer was brewed across 18th-century England as a fiery, properly alcoholic alternative to ale, then carried across the British Empire until it became a fixture in the Caribbean and beyond. The good news: the process scales beautifully, from tipping ingredients into a fermenter to a full controlled brew day. This guide walks both, then helps you dial in the kick, fix the usual problems, and measure exactly how strong your batch turned out.
Start here: your water
Your brew is over 90% water, so its quality shows up in the glass. Chlorine and chloramine react with the phenols in ginger to throw plastic, medicinal, "sticking-plaster" off-flavours. Use filtered water, leave tap water standing open overnight, or dose it with a Campden tablet to strip both in minutes.
The simple "no-boil" approach
This is the fastest way onto the ladder, and it makes roughly 19 litres (5 gallons) of hard ginger beer. Everything goes cold into a clean, sanitised fermenter. Shred the ginger in a food processor first , you want maximum surface area so the flavour and heat extract properly. Juice your limes and orange, add the lot with your chosen yeast, and you are away.
The listed 1.5 kg sugar charge can be added at the start because, in a 19-litre batch, it is within the normal working range of a healthy ale or wine yeast. Step-feeding becomes useful only when you deliberately add extra sugar for a stronger result. In that case, dissolve the extra sugar, divide it into small measured portions, and add those portions only after fermentation is clearly active. Record every addition so your gravity and ABV calculations remain meaningful.
The science: when step-feeding helps
Very high starting sugar concentrations can slow yeast by increasing osmotic pressure. This base recipe is moderate enough to ferment normally in a full 19-litre batch. Step-feeding is an advanced option for additional sugar, especially when chasing a higher ABV. Yeast nutrient, temperature control and an alcohol-tolerant strain matter more than feeding frequency.
Recipe · makes ~19 L
- •2 kg ginger, finely grated or processed
- •1 kg brown sugar
- •500 g caster sugar
- •2 limes, juiced
- •1 orange, juiced
- •1 teaspoon vanilla extract
- •3 cinnamon sticks
- •An ale-style yeast such as Safale US-05 for a rounded, sessionable result, or a Champagne yeast (EC-1118) if you want it drier and stronger
Simple method, step by step
- Clean and sanitise the fermenter, lid, airlock, spoon, strainer and anything else that will touch the cooled liquid.
- Add the processed ginger, citrus juice, vanilla and cinnamon to the fermenter. Dissolve the sugar in several litres of hot water, cool it, then add it to the fermenter.
- Top up with dechlorinated water to 19 litres. Mix thoroughly and take an Original Gravity reading before adding yeast.
- Add yeast nutrient according to the product directions, then pitch the yeast at its recommended temperature.
- Ferment around 18-22°C for an ale yeast, or within the range printed for your chosen wine or Champagne yeast. Keep the fermenter out of direct sunlight.
- Check gravity after seven days. Package only when the reading has remained unchanged for at least two consecutive days.
Choosing the yeast decides the drink
A clean ale yeast leaves a touch of body and a softer finish. A Champagne or wine yeast ferments closer to bone dry and climbs higher in alcohol, for a sharper, more spirituous ginger beer. Unsure which strain fits? The yeast guide breaks down the main families.
The traditional "brew-day" process
If you want the control a proper beer brewer gets, boil it. A brew-day method gives you far better clarity, cleaner flavour extraction and a more stable finished drink. It is more work, but the payoff is a ginger beer that looks and tastes deliberate rather than accidental.
The science of the boil
Ginger contains pungent gingerols and a broad range of volatile aromatics. Heat extracts flavour and reduces the microbial load, yet a long hard boil can drive away the freshest citrus-like notes. A practical compromise is to simmer part of the ginger for 30-60 minutes, then add the remainder during the final 10 minutes or immediately after the heat is turned off. The early addition builds depth and heat; the late addition preserves a brighter ginger aroma.
The science: heat changes the ginger profile
Heating ginger changes the balance of its pungent compounds and extracts flavour into the brewing liquor. Longer heating generally creates a deeper, cooked spice character, while late ginger additions retain more fresh aroma. Splitting the addition gives you both rather than forcing the whole batch toward one flavour.
The process
Bring 19 litres (5 gallons) of water to the boil in your brewing kettle. Add your shredded ginger and sugar. Dropping the ginger into a mesh bag keeps the sediment down and makes the fermenter far easier to clean later. Boil this "ginger wort" for about sixty minutes. While it rolls, sanitise your fermenter properly , this is not optional, and a rushed job here undoes everything else, so if you need a refresher the sanitisation guide covers the products and contact times that actually work.

For serious clarity, drop a Whirlfloc tablet (a form of Irish moss) into the last fifteen minutes of the boil. It clears by electrostatic attraction: the negatively charged carrageenan grabs positively charged proteins and drags them into heavy clumps that sink out. After the boil, chill the wort as fast as you can, ideally with a wort chiller. That rapid "cold break" tightens clarity further. Then aerate hard, because the yeast needs oxygen up front to build a healthy colony.
Feed the yeast, or pay for it later
Ginger and sugar water contains almost no nitrogen, and yeast needs nitrogen to reproduce. Always add yeast nutrient (DAP or Fermaid O) during the boil. Skip it and you invite a stalled ferment and the tell-tale rotten-egg sulphur smell (H₂S). The yeast nutrient guide explains how much and when.
Once the wort is back at room temperature (around 20–22°C, 68–72°F), pitch your yeast. Getting the temperature right matters , hot wort will kill the yeast outright, so be patient. Ferment for at least a week, then check your gravity. When the reading holds steady for two days, fermentation is done and you can move to bottling.
Dialling in the kick
The base recipe is a strong starting point, but ginger beer rewards small, deliberate adjustments.
More heat
Increase the ginger, extend the boil to convert more gingerol into fiery shogaol, or add a pinch of fresh grated ginger at bottling for a raw top note.
More complexity
Cinnamon, cardamom, star anise, a split vanilla pod or cracked peppercorns layer beautifully. Add delicate aromatics late so you keep the top notes. See the spices & herbs guide.
More balance
A fully fermented brew finishes dry. Back-sweeten to taste, or blend in extra citrus. Any added sugar still feeds live yeast, so stabilise or pasteurise first.
When it goes wrong
Most first ginger beers trip on the same three problems, and all three are avoidable.
Stuck or sluggish ferment , almost always a nutrient shortfall or a cold room. Add yeast nutrient, warm the fermenter into the yeast's happy range, and rouse it gently.
Rotten-egg sulphur smell , stressed, underfed yeast. It usually blows off during conditioning, but nutrient and healthy aeration up front stop it happening at all.
Cloudy, hazy finish , normal for a wild or rushed brew. A cold crash drops most of it out; gelatine finings will polish it further. See the clearing & haze guide for every option.
Bottling and carbonation
Over-carbonation happens when yeast receives more fermentable sugar than the bottle can safely contain. The safest homebrew route is to let fermentation finish, confirm a stable Final Gravity, calculate a measured priming dose, and use sound pressure-rated bottles. Sweet ginger beer needs a different plan, such as kegging and force-carbonating, or stabilising and keeping the drink cold.
The plastic-bottle tester
Fill one clean pressure-rated PET soft-drink bottle alongside the glass bottles. It gives a useful indication of pressure as it firms up, though it does not replace a stable gravity reading or an accurate priming calculation. Refrigerate the batch if pressure rises faster than expected.
Bottle safety
Heating sealed, carbonated glass bottles can cause sudden breakage as pressure and temperature rise. This guide does not recommend stovetop pasteurisation of pressurised bottles. Ferment dry and prime accurately, or use a keg when you want sweetness with controlled carbonation.
🧪 The formula: priming sugar
If you let fermentation finish fully (a stable final gravity around 1.000), you add a measured dose of sugar back to create the fizz. A good rule of thumb for a lively ginger beer is 8 grams of sugar per litre of liquid.
Total sugar (g) = volume (litres) × 8
Dissolve it in a little boiling water, stir it gently and evenly through the full batch, then bottle. Prefer not to weigh anything? The priming sugar calculator does the maths for any batch size and carbonation level.
The ginger bug: a natural fermentation starter
For the most traditional route, skip commercial yeast and grow a ginger bug, a mixed wild starter built from the yeasts and lactic-acid bacteria carried on ginger and in the surrounding environment. Wild cultures vary from kitchen to kitchen, so flavour, speed and alcohol production are less predictable than they are with a packaged brewing strain.
Lactobacillus vs Saccharomyces
A ginger bug is a whole ecosystem: yeast (Saccharomyces) that produces alcohol and CO₂, alongside bacteria (Lactobacillus) that produce lactic acid. That acid gives wild-fermented ginger beer a gentle sour tang, closer to a mild sour or kombucha, and a complexity a single lab strain can't deliver.
Growing one is easy and takes a few days:
- 1 Add 20 g of grated ginger (skin on) and 30 g of sugar to a clean jar. Pour in 300 ml of dechlorinated water and cover with a cloth so it can breathe.
- 2 Each day for two to four days, feed it the same amount of ginger and sugar. When it starts bubbling actively, the wild yeasts and bacteria have colonised it.
- 3 Once it smells pleasantly spicy and yeasty, strain off the liquid and use it to start your main batch in place of commercial yeast.
Check the culture before using it. A healthy bug should smell fresh, gingery, lightly yeasty or pleasantly tart. Discard it if you see fuzzy mould, coloured growth, a rotten smell or signs of contamination that differ from normal bubbles and sediment.
Brew this next
Loved the fermenting-fruit trick? Cider is the obvious next pour.
Ginger beer teaches you the fundamentals of sugar, yeast and gravity. Cider uses the exact same instincts on a different fruit, and it is one of the cheapest, most forgiving brews to nail on your first try. See how to work out the strength of a cider batch, complete with its own calculator.
Calculating your ginger beer's strength (ABV)
Knowing your alcohol content is not just about bragging rights, it is basic brewing housekeeping. ABV is worked out from the change in density of your liquid. As the yeast eats the fermentable sugars, it converts them into ethanol and carbon dioxide, and because ethanol is lighter than water (0.789 g/cm³ against 1.0 g/cm³), the specific gravity of your brew falls as fermentation runs.
To measure it you need a hydrometer. Take an "Original Gravity" (OG) reading before you pitch the yeast, and a "Final Gravity" (FG) reading just before bottling. The standard equation, (OG − FG) × 131.25, is reliable, but a dedicated tool removes the arithmetic.
Alcoholic Ginger Beer ABV Calculator
Estimate the strength of your alcoholic ginger beer from your Original Gravity (OG) and Final Gravity (FG). It updates as you type. Open Advanced if your readings were taken warm or you used a refractometer.
- Take an OG reading after you have mixed your ginger, sugar, and water, and before fermentation starts.
- Take an FG reading when bubbling slows and the gravity stays the same for 2 days.
- Enter OG and FG below, then read your result instantly.
- If you add priming sugar for bottling, that does not change the ABV you brewed, it changes carbonation. Use the FG from before priming for your ABV.
- If you measured warm, open Advanced and add temperatures for better accuracy.
0.0% ABV
Tip: ABV is an estimate based on OG and FG. For best accuracy, take hydrometer readings near its calibration temperature, or use temperature correction in Advanced. If you backsweeten for taste, use the FG from before sweetening for ABV.
-
-
Standard
-
Advanced options
If you leave OG and FG temps blank, the calculator uses your raw numbers with no temperature correction.
