You nailed the mash.
The boil sang.
Hop timing was tight.
Now comes the make-or-break move, rapid chilling. Cool the wort quickly and cleanly so fermentation starts on your terms, not the microbes’. Pitch yeast too hot and it dies fast, like the T-1000 in that molten-steel moment.
Pitch at the right temperature and it rewards you with clean flavor, bright aroma, and a stable beer.
Solution, consider investing in a wort chiller. Below is a practical rundown, real-world tips, and gear you can compare.

Top Picks to Compare
- The Copperhead
- The Silver Serpent
- The Therminator
- The NY Brew Supply Deluxe Chiller
Why Fast Chilling Matters
Lower infection risk. Hot wort inhibits microbes. As it cools slowly it becomes a buffet. Rapid chilling narrows the danger window and protects your beer from unwanted guests.
Cleaner flavor. Quick cooling limits dimethyl sulfide formation. Too much DMS tastes like cooked corn. Chill quickly and you help avoid that off note.
Protein drop and clarity. Good cold break drops haze-forming proteins. Less gunk in the fermenter means brighter beer and a smoother path to avoid chill haze.
Target temperature. Aim to get below 27°C, 80°F, fast. Then hit your yeast’s preferred pitching range with intent.
The Three Chiller Types
There are three common designs, immersion, counterflow, and plate.
- Immersion chillers. A copper or stainless coil sits in the wort while cold water runs inside the coil. Heat moves from wort to water, out the hose. For 19 L, 5 gal, most coils run 20 to 40 feet and get the job done with simple hookups.
- Counterflow chillers. Hot wort flows inside a tube while cold water moves in the opposite direction around it. Efficient transfer, very fast, usually needs a pump or gravity service with good flow control.
- Plate chillers. Hundreds of thin plates create huge surface area. Cold water on one side, hot wort on the other, opposite directions. They chill very fast. They demand disciplined filtration and cleaning.
Reality check. Cooling speed depends on coolant temperature and surface area. A well sized immersion coil can rival plate units when groundwater is cold. When groundwater is warm, any chiller benefits from a pre-chiller or ice assist.
Featured Gear: Copperhead Immersion Wort Chiller
The standout features of Northern Brewer’s popular chiller include a 25 foot copper coil and vinyl tubing with standard garden hose fittings.
- All-copper coil conducts heat efficiently and is easy to clean.
- Barbed fittings secure tubing and tame rogue leaks.
- Drop-angle connections reduce contamination risk.
- Dimensions, 9 inches wide, 16 inches tall to the bend, 3/8 ID tubing.
- No need to sanitize separately. Drop it into the boil near flameout, it sanitizes in place.
- Standard garden hose connection for outdoor brewing or laundry-sink hookups.

Brewers say
"Don't cheap out on the ones with simply raw copper ends and hose clamps. The ends connectors on this IC are top notch. Brew on!"
"Worked perfectly and as expected. No leaks and cooled my wort very quickly."
"This is the best on Amazon. I thought about making my own, but considering my time and effort involved, made sense to pay a bit more for one already set up"

Silver Serpent: Sanitary Immersion Option
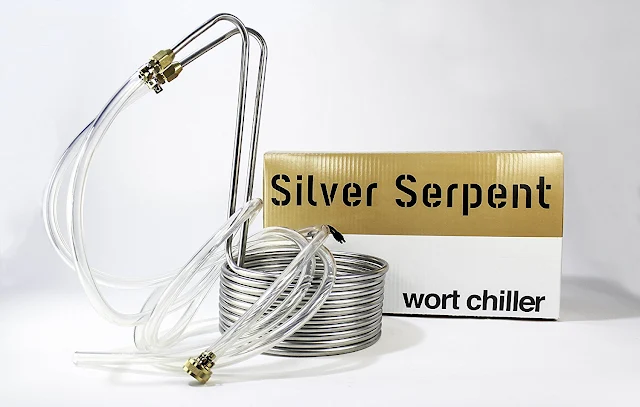
Called the Silver Serpent, Northern Brewer touts it as highly sanitary and easy to handle.
- Drop-angle connections with barbed fittings for secure, kink-free tubing.
- Fewer hose-clamp headaches. Less chance of leaks over the kettle.
- Tubing hangs tension free so you can focus on chilling and whirlpooling.
Therminator Plate Chiller: Fast and Compact
The Blichmann Terminator is a favorite plate chiller in many brew houses. Blichmann also makes a respected gas burner, a solid bit of brew day kit.

What it claims. Rapid chilling, low water usage, compact footprint, and straight-through connections that avoid kinks. Users report chilling 38 L, 10 gal, to pitching range in minutes with proper water flow and filtration.
The tradeoff. Plate units demand disciplined cleaning. Hop matter and trub can lodge in the plates. Backflush immediately after use and circulate hot cleaner for best results.
NY Brew Supply Deluxe Counterflow

NY Brew Supply on their chiller, durable high-temp outer hose, 25 feet of 1/2 inch copper inside, garden-hose friendly brass fittings that let you set angles for tidy hose runs. Users praise performance and value, many prefer silicone tubing and clamps for leak-free service.
How to Use an Immersion Chiller
- Drop the clean coil into the kettle with 10 minutes left in the boil so it heat sanitizes.
- At flameout, connect to your water source. Outdoor brew, garden hose. Indoor brew, laundry sink adapters.
- Run water until you reach your target pitch temperature. Verify with a thermometer. Do not overshoot cold, cold pitching can stall yeast.
Chilling Tips and Tricks
- Whirlpool for speed. Gently whirlpool the wort while chilling. Moving wort across the coil skin boosts heat transfer and tightens your cold break pile in the center.
- Staggered cooling. Chill to about 80°C, 176°F, pause for a hop stand if your recipe calls for it, then finish the chill to pitch range. This keeps aroma locked in.
- Pre-chill warm groundwater. Run supply water through a coil in an ice bath first, then into the chiller. Simple, effective, and cheap.
- Flow management. Faster water flow helps. Slower wort flow helps. If you have a pump, recirculate wort gently while throttling output to maximize contact time.
- Water savings. Capture outlet water for clean-up, or route it to the garden once it is cool enough for plants.
- Sanitary mindset. Keep all post-boil surfaces clean. Do not let hose water drip into the kettle. Purge transfer lines with sanitizer before use.
Garden Hose Convenience
Chillers with garden-hose connectors make outdoor brew days easy and keep your kitchen calm. A laundry-sink adapter offers the same convenience indoors. Free your space, reduce spills, and streamline cleanup.
DIY Options
The hardware route can save cash if done smartly. Copper tubing plus compression fittings can make a solid immersion coil. For design ideas, see these immersion upgrades and a counterflow build. Video walkthrough below.
When Groundwater Is Too Warm
Use a pre-chiller. Place a copper coil in an ice bath to chill the incoming water before it hits your main chiller. Twenty five to fifty feet of coil works well. Here is a simple setup.

Frozen water bottles do the job for cheap. Swap them as they thaw to keep the bath cold.
Cleaning and Care
Immersion coils. Rinse hot after use, wipe visible residue, and let dry. A light soak in warm cleaner restores shine.
Plate units. Backflush immediately in the opposite direction of wort flow to push out hops and trub. Circulate hot cleaner, then hot water, then sanitizer. Do not let residue sit. That is how clogs happen.
Cleaners. PBW is the workhorse. Star San plays well with copper. Avoid chlorine bleach on stainless since it pits and damages surfaces.
Pump Assist
If water pressure is weak, a small utility pump helps. Many brewers use pond or aquarium pumps to recirculate ice water through the chiller. Faster cooling and less tap water waste. For aeration later, these aeration pumps are good for wort and yeast health, but aerate only once the wort is in the pitching range.
Quick Reference: Best Practices
- Sanitize anything that touches chilled wort. Treat post-boil as sacred ground.
- Chill hard to 27°C, 80°F, then land precisely on your yeast’s pitch range.
- Whirlpool during chilling for faster heat exchange and tighter trub cones.
- Pre-chill supply water with ice if tap water is warm.
- Backflush plate chillers immediately. Clean today, not tomorrow.
- Capture chiller outflow for cleaning or watering the garden once cool.
Buy once, clean well, chill fast. Your yeast will thank you and your beer will taste the way you imagined it.